

My “Weekend” Pinterest Upcycling Adventure
It all started with a “have a look at this” from my husband who was browsing around on Pinterest. It was this funky colourful pom pom covered poof. “That looks very cool, I could totally do that”, I said. So I went off to pin it myself. Little did I know that once you looked a little bit more into it, that it was a bit more than an ‘easy weekend DIY projects for home decoration’ that the blog proclaimed.
The first blog I found it on had no information at all other than some pictures and a link to another blog. This blog was an admiration blog about the original blog that just happened to be in Portuguese, just to make life easier! This very well may end up on Pinterest as well deepening the rabbit hole! Hopefully, this one will give you some better practical ways of actually doing this thing!
First things first. This will not get done in a weekend! Not if you start from scratch. Even if you had all the elements together, getting the pom poms onto the fabric would take the whole weekend! I started in May and as time went on, I set myself a deadline to be finished by Christmas, it ended up being very late on 23 December in fact! Now, I was doing it around my full-time job, my flopsyshop.ie job and family life. One pom pom at a time.
Things you will need:
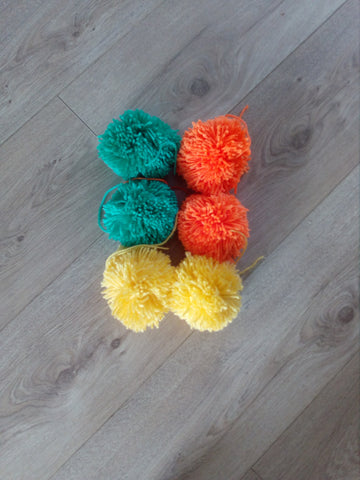
- Lots of wool – any colours you like. I bought them in Dealz, the local all sorts shop and the bargain bin in https://www.airlessgeraete.com/ shop in Smithfield. Some people also gave me some leftover wool they had a home.
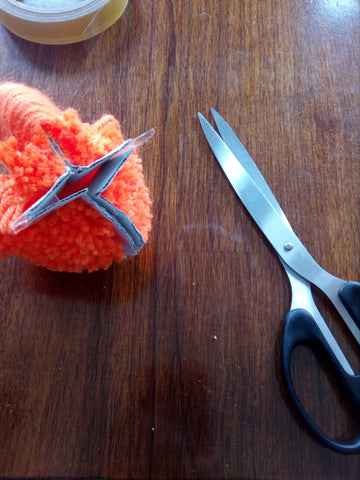
- A pom pom template – you can buy packets of them on eBay and Amazon but I went oldskool and used a cardboard cut-out template. I used the same circle to draw it out, it was actually an empty ribbon wheel that I picked up in the Fabric Counter. There are lots of videos on YouTube as well on the different methods people use. Find one you like best.
- You need at least 250 pom poms - I was doing a rolling count on Facebook but I lost count in the end. I thought I had enough but when I started to put them on, but ran out pretty quickly. I do know that I had to make one last one to finish because the colours I had left were too similar to go together in the little blank spot that was left!
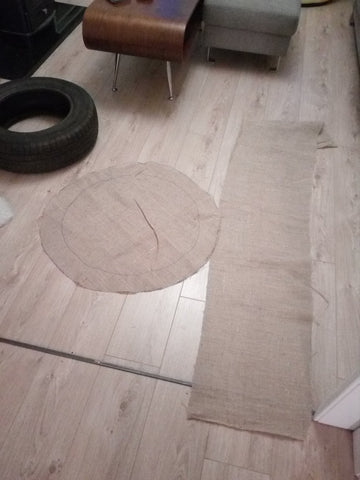
- A tyre - I picked one up from a local garage and gave it a good wash. So you don’t need to find it on the side of the road and patch it up like the original blogger (theirs had threads sticking out, danger!)
- Some legs you like - We got ours here: https://www.airlessgeraete.com/. We should have chosen the taller size because they are a beautiful walnut colour but are hidden under pom poms so we can’t appreciate them.
- Wood – This is to make the base and the seat. Any cheap old thing from the DIY shop will do, so long as it’s strong enough to sit on. You need two circles, one to sit on and one to screw the legs on to. We cut squares to help get a little extra height.
- Hessian Fabric or IKEA Stopp anti-slip underlay or a used bed sheet or similar. I used hessian fabric from the fabric counter but lessons learned the hard way, I would use the IKEA one if I did it again, less unravelling risk. The original blog used an old bed sheet but I thought it might be too much effort in poking through the wool to tie the pom poms (again, no way it was a weekend project!).
- Kick-ass scissors! I tried four different types of scissors. I went to the fabric counter again and asked because I was cracking up. They gave me one, it was a little bit expensive at 12 euro but oh my, worth every penny. Those scissors and some chunky wool speed things up immensely!
- Duct tape or strong glue to stick the wood onto the tyre. We used the big silver duct tape stuff but it’s not 100% and I just noticed a discrete bottle of some sort of glue on that original blog.
- Time. Don’t underestimate how long this will take, make no promises to when the poof is finished. I learned that the hard way, as one day I found a “countdown to Christmas” timer sitting on top of the half-finished chair.
This is what I started with
and this is what final result looks like.

Leave a comment